
Edit: Meanwhile I have found a better way to migrate an existing centos unencrypted install to a fully encrypted install with /boot as the only unencrypted disk space. This solution is much preferred over the one described in this post. The new approach is here.
Inspired by yet another incident in the news of a laptop with sensitive information getting stolen, you start imagining what would happen if someone would get hold of your laptop. How much sensitive data would be on it and what would the consequences be. A small investigation revealed that the consequences could be quite big. There are various personal document stored, version control systems and IDEs with insecure password storage and of course various browser history files and cookies. That made me a bit nervous.
Therefore, I set out the investigate how to make this laptop more secure. The setup is an extension of setups I found on the internet where typically LUKS over LVM or LVM over LUKS is used. The current setup will in effect be LVM over LUKS over LVM.
From the looks of it there is no personal data on the root file system (as it should because the user has all its files under /home). Therefore encrypting the home and data partitions would be sufficient. That at least would save me from a lot of hassle trying to have an encrypted root volume.
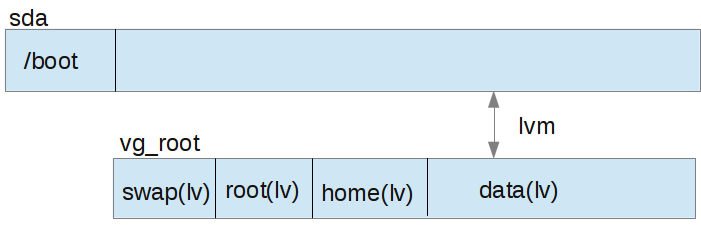
The laptop is running centos 6.4 and uses a typical logical volume setup. There is a physical disk (/dev/sda) with a /boot partition on a physical disk partition and the other partitions are added to a volume group from which home and data volumes are allocated. This setup is shown below.
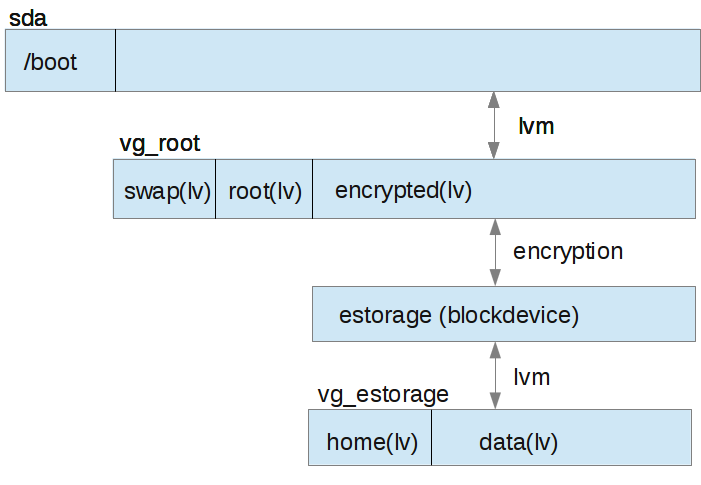
The idea is to use LUKS for encryption and to use a single logical volume called encrypted instead of home and data. Then using LUKS, a decrypted block device (called estorage) is created that provides encryption and decryption of data on the fly to/from the encrypted logical volume. Then in the next step, this estorage block device is used as a physical volume of a new volume group vg_estorage. Then from the vg_estorage volume group, the home and data logical volumes can be created as before.
This is a very interesting setup that shows the power of the device mapper on linux. Both Logical Volume Management and encryption make use of this device mapper. Basically, the device mapper allows block devices to be combined in various ways. For instance, in design pattern terminology, logical volume management is more or less a composite design pattern where multiple block devices are combined into a big storage pool (volume group) from which individual logical block devices (logical volumes) are allocated. In the case of the disk encryption it is in effect an application of the decorator design pattern. Other powerful features in linux are the ability to treat a file as if it were a disk (using losetup) and the way to use a physical disk partition or logical volume as a disk (using kpartx). But I digress, below I will discuss how to get from the initial setup to the final setup while keeping a working system all the time.
Disk space
The first thing to consider is disk space. The migration will involve copying of data and you should at least have the amount of disk space free on the vg_root volume group for a copy of the biggest logical volume. So, if home has 10GB and data has 15GB, you should make sure you have 15GB free on vg_estorage. If this is not possible, then the safest option is to go to runlevel 1 (init 1) and copy the data on the involved logical volumes to a separate disk. It is also possible to extend the volume group vg_root with storage on an external disk but you should be very careful there since then your system will not startup without the external disk and there are some additional steps involved in moving data from the external disk back to the system (using the ‘dangerous’ pvmove command).
Backups
If you are wise, create a backup of your entire disk first so you can always go back to a working system. I always boot up a linux rescue system, and then mount a filesystem on an external disk and backup all data using dd:
dd if=/dev/sda bs=32M | gzip -c > sda.img.gz
Of course, replace sda by the physical disk name of your disk. The gzip is optional and makes the backup smaller but also much slower. While executing the process I also used the same procedure to create intermediate backups. It is also time for a disclaimer now. I have done my best to make these instructions as complete as possible but these executing these instructions is at your own risk.
Creating encrypted storage
With disk space out of the way, a logical volume encrypted can be created using:
lvcreate -L<size>G -n encrypted /dev/vg_root
then setup encryption on the device:
cryptsetup --verbose --verify-passphrase luksFormat /dev/vg_root/encrypted
This step asks for a password and uses default encryption options.
Open the encrypted logical volume
cryptsetup luksOpen /dev/vg_root/encrypted estorage
The above step asks for the password to decrypt the logical volume and creates a new device /dev/mapper/estorage that provides the decrypted view of the data.
Now, it is time to backup the LUKS header of the encrypted disk so in case of disk problems you might still be able to recover data.
cryptsetup luksHeaderBackup --header-backup-file header.estorage /dev/vg_root/encrypted
Keep the backup file in a safe place. There is no security risk if someone else gets hold of this file. It is only used to attempt a restore when you have a disk problem.
Now add the following entry to /etc/crypttab to make sure the system will ask for a password after booting and make the decrypted device /dev/mapper/estorage available:
estorage /dev/vg_root/encrypted none
Now create the physical volume and volume group based on estorage
pvcreate /dev/mapper/estorage
vgcreate vg_estorage /dev/mapper/estorage
Also, create a small logical volume for testing.
lvcreate -L 100m -n test vg_estorage
At this point it is good to attempt a reboot and to verify that the system still boots.
After booting you can inspect the logical volumes and volume groups using the lvs and vgs commands. What you should notice there is that the volume group test is seen but that it is inactive. You can tell from the output of lvs since it will show -wi------ without the a flag for active as in -wi-a----.
What is happening here is that at boot, the system sets up the logical volumes from the vg_root volume and creates the decrypted device estorage. The system then will see the volume group vg_estorage which is on the estorage device but will not have activated the logical volumes for it.
Luckily there is a simple fix for this which is a feature (on Centos at least) to activate logical volumes at a later stage. This is done using the netfs service. First make sure the netfs service is enabled and if not enable it using
chkconfig netfs on
Then, to test the setup for the test logical volume, activate the vg_estorage volume group and create a file system on the test logical volume:
vgchange -ay # activates all logical volumes
mkfs.ext4 /dev/vg_estorage/test
mkdir /mnt/tmp # create temporary mount point for checking
Now add an entry to the /etc/fstab file for test similar to other entries for for example /home, but add one additional flag _netdev. The entry could like like this:
/dev/vg_estorage/test /mnt/tmp ext4 _netdev,noatime,acl,user_xattr 1 2
Then issue mount -a to verify that the test logical volume is mounted.
Because of the special flag _netdev, the netfs service will activate logical volumes after the estorage device is made available but before the filesystems are mounted from /etc/fstab.
It is time for another reboot now. This time you should see the test logical volume being mounted at /mnt/tmp after boot.
This is the basic setup for LUKS which is in effect LVM over LUKS over LVM. If this works, then we can start copying data from the unencrypted logical volumes on vg_root to the encrypted storage on the vg_estorage volume group.
Copying data and resizing the vg_estorage volume group
I recommend to use the step by step method of extending the encrypted logical volume, copying a volume from vg_root to vg_estorage, testing (using a reboot), and then deleting the old logical volume on vg_root. In particular, the reboot is a good verification that everything still works. Only delete data if you are really sure that it works and make intermediate backups if you think it is needed. Also, use runlevel 1 in all following instructions.
First check the disk space required:
lvs # find out the size of the logical volume you want to copy on vg_root
vgs # find out the available free space on storage, and make sure it is enough
If there is not enough disk space, you can use disk space that was freed up by logical volumes that you copied earlier. To extend the vg_estorage volume group, proceed as follows:
lvremove /dev/vg_root/<oldlvname> # remove an unused logical volume from vg_root
lvextend -L +<extra>G /dev/vg_root/encrypted # extend the logical volume for encrypted data
cryptsetup resize estorage # inform the encryption of the change in size
pvresize /dev/mapper/estorage # inform LVM on the vg_estorage volume group about the change
This is more or less a Russian doll and shows why it is important to understand the layering. Resizing can be done without any down time and also at runlevel 3 and 5.
Now that sufficient disk space is available there are two ways to copy. Either create a copy on the vg_estorage volume group with the same size and use dd to copy data like
dd if=/dev/vg_root/<lvname> bs=32M of=/dev/vg_estorage/<lvname>
or create a new logical volume with possibly different size and copy at file system level
mkfs.ext4 /dev/vg_estorage/<lvname> # create filesystem
tune2fs -m0 /dev/vg_estorage/<lvname> # remove reserved blocks for non-root fs
mount /dev/vg_estorage/<lvname> /mnt/tmp # mount it
rsync -av --delete /path/to/old/<lvname>/mountpoint /mnt/tmp # copy data
With the second approach it is also possible to copy data while in a higher runlevel doing the expensive full data sync while still using the system and then in runlevel 1 repeat the rsync one more time to quickly make the copy completely identical.
After copying, edit /etc/fstab to replace /dev/vg_root/<lvname> by /dev/vg_estorage/<lvname> and add the _netdev option. Reboot the system to verify that everything is still working.
Suspend/resume
I found a small issue with suspend/resume where the filesystems were not mounted again after suspending to RAM and resuming (I do not have suspend to disk configured).
This issue was fixed by adding the following script /etc/pm/sleep.d/99-cryptsetup-custom
#!/bin/bash
echo "Custom hook called: $0 $*"

if [[ "$1" = "resume" ]]
then
  df
  echo "$0: Remounting all devices from /etc/fstab..."
  /etc/init.d/netfs start
  df
fi
Edit: it appears that this trick does not really work and I still lose some of the mounts when the system resumes.
/tmp and swap
If /tmp is located on your root logical volume then it is a good idea to encrypt that as well. Also, encrypting swap is a good idea because confidential data could leak there as well. See the Centos wiki for instructions on how to do this. For /tmp an alternative is to use tmpfs, thereby also ensuring that no trace is left of data in /tmp when the system is shutdown. Another alternative would be to add tmp as a regular volume in the vg_estorage volume group, but I could not get that approach to work.
Cavaets
There can be more sensitive information on your system. In particular, the root home directory could contain sensitive data as well as /var/tmp. It is probably best to install your system straight away with disk encryption. I will most likely do this myself as well at some point in the near future.
Performance
I have found the performance impacts of encryption to be negligible. The reason is probably that my system has ample memory and is usually never blocked (noticeably) to the user because of IO. Also, it has a quad-core processor which is mostly idle (it is used for mail, web, and also for Java Enterprise software development). In some cases I see 1-2% of CPU use of kcryptd and when doing large sequential writes (typically using dd), kcryptd sometimes has 100 % CPU. I have not noticed any performance degredation in my daily work, including timing of expensive operations involving database and Java application server.
Pingback: Encrypting an existing Centos install | Nonsense and other useful things